Announcement

Collapse
No announcement yet.

make or break (MOB)

Collapse
X
 
  • Filter
  • Time
  • Show
Clear All
new posts

  • make or break (MOB)

    I have watched the webinar on MOB, but I am still a bit confused about its application.

    Do you click over the 1st Wave (#1) to see how high the 3rd will go?

    Do you click over the #3 Wave to see how high the 5th will go?

    Or do you click over the last high or last low?

    What is confusing about the webinar is that the 3rd Wave is a high. But what do you do if the 3rd wave is not a high (i.e. there is another high between 3 and 5)?

    Also, how are the Elliot Waves related to this? Do I have to wait until the 4 is formed before I am able to click on the 3rd Wave and see how high the fifth will go?

    When do I see the number form on my chart that tells me an Elliot Wave has started or completed?

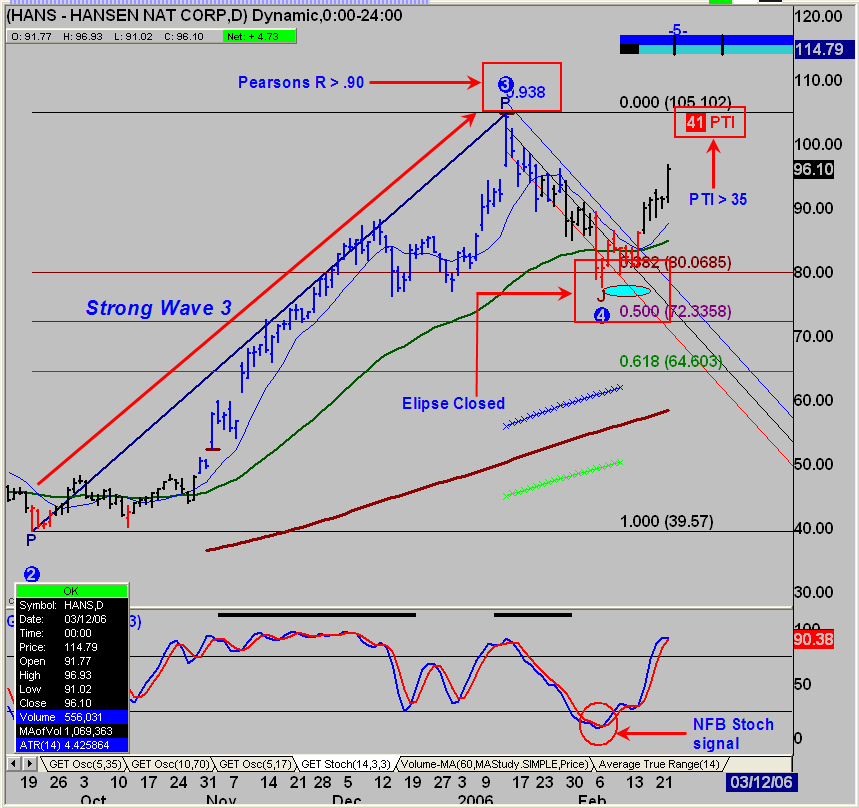
    Finally, what do the blue, green and red tracks represent?

    Thank you.

  • #2
    Hi Rob,

    Very good questions. Because of the accuracy of the MOB, many new traders of Advanced Get tend to overuse it, but in the right trading context, it can be quite powerful. The acronym stands for Make or Break. In a nutshell, the MOB is primarily utilized in two types of trading setups.

    The first of these is via the Type I Trade. The MOB tool is clicked on the high of Wave 3 to illustrate where Wave 5 is likely to end. This is allows traders to have some confidence about where to take profits or at least lighten up on a position. They can be used in both buy and sell setups. Here's an example of a Type I trade that I took a few months back.


    As you can see from the result, the MOB helped me figure out where this one was headed.


    The second function of the MOB is to help traders isolate where they can comfortably take a counter-trend or Type II Trade. This involves fading the overall direction of the trend. It's important to remember that this is not the only parameter for a Type II Trade, so don't rely on it exclusively.

    I wouldn't recommend using the MOB off of a Wave 1 as the wave count hasn't yet become established enough to gain credibility. The more the pattern develops and holds the count, the more likely it is that the Wave 5 will end where the MOB indicates it will end.

    By definition, Wave 3 is the most powerful wave. It needs to exceed the height of Wave 1 to meet that criteria. Wave 4 is the pullback from a strong Wave 3 that helps the trader set up for Wave 5. The illustrated numbers indicate that any particular wave is still developing. Once the wave count illustrates the next wave in the series, it confirmes that the previous wave has been completed.

    You don't have to wait until Wave 4 has been labled before using the MOB as Wave 3 may still be building, but waiting confirmes the validity of the count.

    The railroad tracks are there to help measure the strength/weakness of Wave 4. The deeper the retracement, the less likely a new high will be realized in Wave 5.

    Hope this helps clear things up a bit.

    Comment


    • #3
      There is a very good efs called automob.efs which will automatically place MOB's for you, aswell as an autoellipse and autofib.

      here:

      http://share.esignal.com/groupconten...ous&groupid=84

      Although sometimes I remove them from smaller timeframe charts, as they can clutter up a chart.

      Paul.

      Comment

      Working...
      X